This is a photo editor. You can be able to enhance, filter, rotate, crop, zoom and many other task using this app.Overview of the apps:1. Slide your ... Read More > or Download Now >
PicEdit for Windows Phone
Tech Specs
- • Version: 1.0.0.0
- • Price: 0
- • Content Rating: Not Rated
- • Requirements: Windows Phone 8.1
- • File Name: PicEdit.XAP
User Ratings

- • Rating Average:
- 4 out of 5
- • Rating Users:
- 1
Download Count
- • Total Downloads:
- 23
- • Current Version Downloads:
- 23
- • Updated: March 5, 2015
More About PicEdit
Overview of the apps:
1. Slide your screen right and left. You will get different options in different screen.
2. At the bottom of your app, in app bar you will find three icons which are used for adding, reset and saving an image.
3. The app is comprised of 13 tab named “Beatify”, “Rotate”, “Adjust”, “Filter”, ”Blur”, ”De-noise”, “Effect”, ”Color Space”, ”Zoom”, ”Crop”, “Re-construct”, “Paint”, ”Frame”. Each tab holds multiple functionalities.
Add an image:
1. Clicking on the ‘+’ icon of app bar, you will be able to add an image form your image gallery.
2. Clicking on ‘+’ icon of app bar, you will also able to take a photo using your camera.
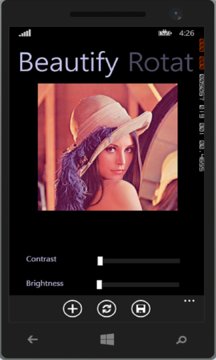
Beautify the image:
1. Under the Beautify tab you find two sliders. These sliders are used for increasing the image quality.
2. Within two sliders one is used for increasing the contrast of the image and other is used for increasing the brightness of the image.
Rotate the image:
In this Rotate scheme, the app will help you to rotate your image at 90, 180, 270 and 360.
Besides this, you can also flip the image. Vertical flip and horizontal flip are the two options for flipping the image.
Adjust the image:
Under the Adjust tab you find two sliders.
Here, two sliders are also used for increasing the image quality.
Within two sliders one is used for increasing the contrast of the image and other is used for increasing the brightness of the image.
Filter the image:
If your image contains several types of noise
If smoothness is needed, you can use any kinds of filter as you wish. Several kinds of filter such as “Mean”, “Max”, “Sobel”, ”Median”, ”Min” and “Laplacian” filters are used.
Blur the image:
1. If the image needs to be smoothed, then one can use the blur filter.
2. Within Blur tab “Low”, “Medium” and “High” filter represents the degree of smoothness. High filter represents that the output image will be more smoothed.
Denoise the image:
1. This phase will degrade noise of the image in multiple levels. In this case low represents the rate of removal is very small.
Effect on the image:
1. In this menu noise can be added
2. If you want to remove the noise, you will just click on the de-noise button.
Color Space Conversion:
1. Within this tab different color space conversion is possible. Red, Green, Blue, Negative and Grayscale conversion has been performed.
Zoom the image:
1. You will able to zoom the image using a slider
2. Within this scheme you will get another option for resizing the image. After clicking the resize button, a popup will be raised in where you will give height and width of the resized image.
Crop the image:
1. You can crop a specific area of the image clicking select button.
2. Clicking the select button you will be able to select the area on the image using touch on the image.
3. After selecting the cropping region you will just click on the crop button. A popup will be raised which will ask you to crop or not. If you want then you will just click on the yes button otherwise no.
Re-Construct the image:
1. This phase amalgamates two functionalities. One is for amplify and other is Decline.
2. Amplify increases the small edge width and Decline decreases the large edge width.
3. You can use these two facilities for constructing the broken alphabet or binary broken photo.
Paint in the image:
1. If you want to draw something into your photo, then you can select any brush. In this app, three brushes are used.
2. There also exist a color picker and you can select any color from the color picker.
Frame the image:
1. You can add rectangular frame.
2. You can use any color using color picker
3. The thickness of the frame can also be increased using thickness slider.
Reset the image:
1. If reset button is clicked, then the original image will be set into the editor.
Save the image:
1. If you want to save an image just click on the save icon. One popup will be appeared where you will give your image name.